About us
 Who We are
 Our Products
 E-books
 Contact us
 Skilled Tasker
 Speedo Delivery
 Best Match
 Locate Bee
 Hire Flutter Developer
 Hire Hybrid Developer
 Hire Android Developer
 Hire Frontend Developer
 Hire ReactJS Developer
 Hire NodeJS Developer
 Hire Xamarin Developer
 Hire iOS Developer
 Hire WordPress Developer
 Power BI
 Power Pages
 Copilot Studio
 Power Automation
 Power Apps
 Power Virtual Agents
 Developer Tools
 Databases
 DevOps
 Identity
 Integration
 Management and Governance
 Internet of Things
 Migration
 Mobile
 Security
 Web
Web
 Analytics
 Sales
Sales
 Marketing
 HR
HR
 Power Web Form
 Power Mailchimp
 Xero
Xero Click Dimension
 Document Core Pack
 Docusign
 Sage
Sage Telephony
 Hootsuite
  FLS
FLS  Supply Chain Management
 Intelligent Order Management
 Flutter Development
 Ionic Development
 Angular JS
 JavaScript
 Wearable
 AR VR
AR VR
 MongoDB
 Amazon Web Services
 MySQL
MySQL
 User Experience
 User Interface and Evaluation
 User Experience Review
 Digital Marketing
 Social Media Marketing
 PPC
PPC
 SEO
SEO
 IT consultation services
 Dev Ops
 Launching and Growth Hacking
 Scope of Work
 Product Discovery Workshop
 Strategic Business Analysis
 Food And Beverage
 Banking and Financial
 Travel and Tourism
 Oil and Gas
 Energy and Utility
 E-commerce
 Media and Social
 Healthcare
 Hospitality
 Education
 Real Estate
 Customer Support
 Lead Generation
 Appointment Setter
 E-Commerce


In today`s digital landscape, APIs (Application Programming Interfaces) are the backbone of modern software program software development, allowing seamless conversation amongst numerous applications and services. As agencies increasingly depend upon APIs to deliver their services, ensuring their protection turns into paramount. Enter OAuth2.0, the unsung hero of API protection.
In our guide, we dive into the importance of securing APIs and introduce you to OAuth2.0, a powerful protocol designed to defend your API endpoints. Our mission? To equip you with the information and tools needed to assemble a rock-robust API with Node.js and OAuth2.0. Why does API protection matter? Consider this: your API serves as a gateway to sensitive records and functionalities. Without the proper protection measures, it becomes liable to attacks, jeopardizing now not first-rate records but moreover your reputation and purchaser trust. OAuth2.0 emerges as a robust approach to cope with annoying conditions. By imparting a framework for consistent authorization, OAuth2.0 helps you to to manipulate get proper access to your API reasserts with precision. But how exactly does it work? And how can you put it in force in your Node.js application? Join us on this journey as we find out the mysteries of API protection and will let you assemble a consistent API with Node.js and OAuth2.0. Get prepared to enhance your applications and encompass the future of consistent API development. OAuth2 is one of the maximum well-known specifications for API authentication today, despite the fact that wrapping your head spherically could be a challenge. In today`s digital landscape, securing your APIs is extra vital than ever. As applications continue to develop and evolve, so do the strategies in which they address sensitive records. One of the most robust mechanisms for ensuring the protection of your Node.js APIs is OAuth2.0 authentication. Whether you’re building a smooth app, or a complex agency solution, expertise and enforcing OAuth2.0 will extensively beautify the protection of your Node.js API. In this blog post, we are able to find out the requirements of securing your Node.js API with OAuth2.0, protecting numerous implementation strategies, satisfactory practices, and addressing commonplace region annoying conditions along the manner. We`ll moreover provide realistic examples and steerage for integrating third-birthday party OAuth companies like Google.
By the end of this blog, you can have a robust expertise of the manner to put in force OAuth2.0 to make certain your Node.js API remains consistent and efficient.
OAuth 2.0 is an open authorization framework that allows third-party applications to access a user’s data without exposing their credentials, such as passwords. It is one of the most widely adopted protocols for securing APIs and is used by popular platforms like Google, Facebook, and GitHub.
The primary purpose of OAuth 2.0 is to enable applications to act on behalf of users securely. It achieves this by issuing access tokens instead of relying on direct sharing of user credentials. These tokens are short-lived and grant limited access to protected resources, ensuring enhanced security.
1.Resource Owner: This refers to the user who owns the data that is being accessed.
2.Client: The application requesting access to the user’s data, such as a web or mobile app.
3.Authorization Server:
Responsible for authenticating the resource owner and issuing access tokens to the client.
4.Resource Server:
The server hosting the protected resources (e.g., APIs) that validates access tokens and provides access based on the token’s validity.
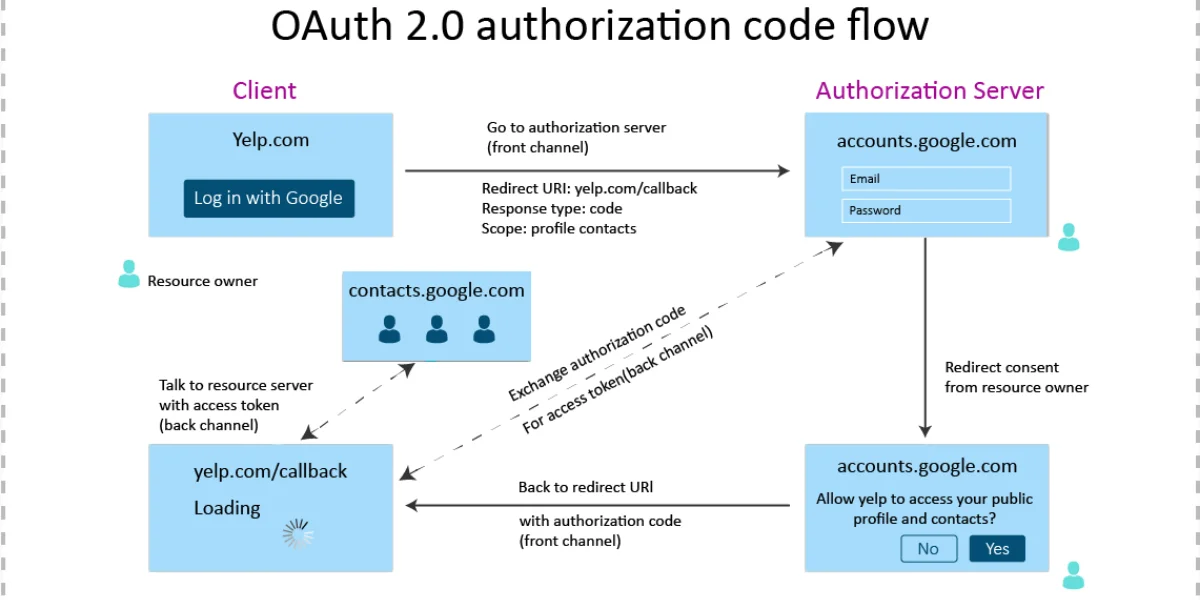
OAuth 2.0 defines various roles and workflows that ensure secure communication between the entities. The authorization server plays a critical role by authenticating the user and issuing access tokens. These tokens act as a temporary pass that allows the client application to access the protected resources on the resource server. Since the user’s credentials are never shared with the client, the process ensures data privacy and security.

OAuth 2.0 offers several grant types, or flows, to obtain access tokens based on the specific use case:
Authorization Code Flow:
Commonly used for server-side applications (e.g., web apps).
The client receives an authorization code after the user grants permission. This code is then exchanged for an access token.
Implicit Flow:
Suitable for browser-based or client-side applications.
Tokens are issued directly to the client without an intermediate step of exchanging an authorization code.
Resource Owner Password Credentials Flow:
Used in scenarios where the client has direct access to the user’s credentials.
The credentials are sent directly to the authorization server, which issues the token.
Client Credentials Flow:
Used when the client application needs to act on its own behalf rather than on behalf of a user.
This is commonly seen in server-to-server communication or system-level authentication.

In Node.js applications, OAuth 2.0 is commonly used for:
Let’s dive deeper into implementing OAuth 2.0 authentication for a Node.js API, exploring common scenarios, implementation strategies, and how to integrate third-party OAuth providers like Google.
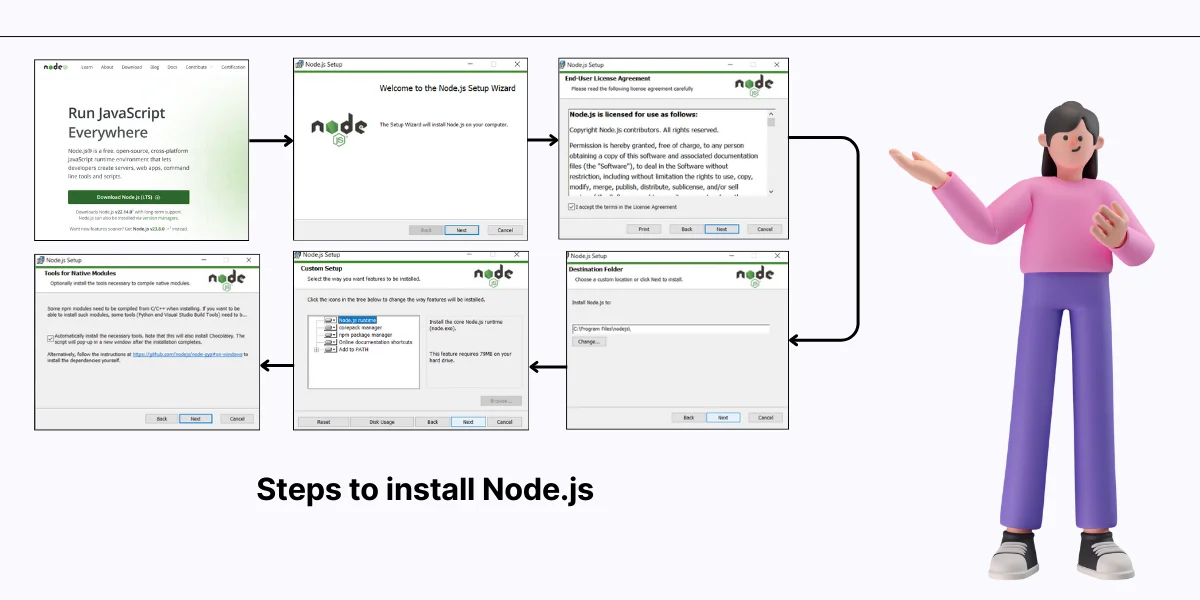
Here’s a straightforward guide on how to get started by installing Node.js and npm.
1.Install Node.js: Begin by downloading and installing Node.js from the official website (https://nodejs.org/). Node.js is a JavaScript runtime that allows you to run JavaScript code outside of a web browser, making it ideal for server-side development. Follow the installation instructions provided for your operating system.
2.Verify Installation: Once Node.js is installed, verify the installation by opening a terminal or command prompt and typing the following commands:
node -–version npm –version
3.Update npm (optional): Although npm is included with Node.js, it’s a good practice to update it to the latest version. Run the following command in your terminal:
npm install npm@latest –g
4.Create Your Project Directory: Now that you have Node.js and npm installed, navigate to the directory where you want to create your API project
mkdir my-api-project cd my-api-project
When securing a Node.js API using OAuth 2.0, one of the first things to consider is setting up the OAuth 2.0 server. You can implement these using libraries such as oauth2-server or by integrating with third-party OAuth providers.
To begin, let’s create a simple OAuth 2.0 server using express-oauth2-jwt-bearer, which allows you to validate JWT (JSON Web Tokens) for securing routes.
npm install express express-oauth2-jwt-bearer
Next, create an Express server that validates JWT tokens using the OAuth 2.0 authentication mechanism.
const express = require(‘express’);
const { oauth2Bearer } = require(‘express-oauth2-jwt-bearer’);
const app = express();
// Middleware to authenticate JWT tokens
app.use(oauth2Bearer({
issuer: ‘https://your-authorization-server.com’,
audience: ‘your-api’,
algorithms: [‘RS256’],
}));
// Secure endpoint
app.get(‘/protected’, (req, res) => {
res.send(‘This is a secure API endpoint.’);
});
app.listen(3000, () => {
console.log(‘Server running on port 3000’);
});
In this setup, we use the express-oauth2-jwt-bearer middleware to verify JWT tokens. The issuer and audience parameters must match the values of the OAuth 2.0 provider’s configurations.
The authorization code flow is one of the most common OAuth 2.0 flows. In this flow, the client (Node.js app) receives an authorization code after the user authenticates, which is then exchanged for an access token. This flow is used when the client is a web application or a mobile app that needs to authenticate on behalf of the user.
Here’s an overview of the flow:
1.The client redirects the user to the OAuth provider’s authorization endpoint.
2.The user logs in and grants permission for the client to access their data.
3.The OAuth provider redirects the user back to the client with an authorization code.
4.The client exchanges the authorization code for an access token and a refresh token (if applicable).
You can implement this flow in Node.js using packages like passport-oauth2 for integrating with third-party OAuth providers, including Google OAuth 2.0.
Many applications require users to authenticate using third-party services like Google, Facebook, or GitHub. OAuth 2.0 simplifies this by delegating authentication to the OAuth provider.
Let’s look at integrating Google OAuth 2.0 in a Node.js application.
npm install google-auth-library express
const express = require(‘express’);
const { OAuth2Client } = require(‘google-auth-library’);
const app = express();
const client = new OAuth2Client(‘YOUR_GOOGLE_CLIENT_ID’);
app.get(‘/auth/google’, (req, res) => {
const redirectUri = ‘YOUR_GOOGLE_OAUTH_REDIRECT_URL’;
const url = client.generateAuthUrl({
access_type: ‘offline’,
scope: ‘https://www.googleapis.com/auth/userinfo.profile’,
redirect_uri: redirectUri,
});
res.redirect(url);
});
app.get(‘/auth/google/callback’, async (req, res) => {
const code = req.query.code;
const redirectUri = ‘YOUR_GOOGLE_OAUTH_REDIRECT_URL’;
const { tokens } = await client.getToken({ code, redirect_uri: redirectUri });
client.setCredentials(tokens);
res.send(‘Authentication successful!’);
});
app.listen(3000, () => {
console.log(‘Server running on port 3000’);
});
JSON Web Tokens (JWT) are often used in conjunction with OAuth 2.0 as a secure way to represent access tokens. These tokens can be securely transmitted between the client and the server, ensuring that the client has the necessary authorization to access protected resources.
To implement JWT authentication in Node.js, you can use the jsonwebtoken package:
npm install jsonwebtoken
const jwt = require(‘jsonwebtoken’);
// Issuing a token
const payload = { userId: 1};
const secretKey = ‘your_secret_key’;
const token = jwt.sign(payload, secretKey, { expiresIn: ‘1h’});
// Verifying a token
jwt.verify(token, secretKey, (err, decoded) => {
if (err) {
console.log (‘Token verification failed:’, err);
} else {
console.log (‘Decoded token:’, decoded);
}
});
When implementing OAuth 2.0 in your Node.js application, it’s crucial to test the authentication process. One of the most effective tools for this is Postman, a popular API development tool.
To test OAuth 2.0 in Postman:
1.Select the Authorization tab.
2.Choose OAuth 2.0 from the list of authentication types.
3.Fill in the details such as the Client ID, Client Secret, and Token URL provided by the OAuth provider.
4.Click Get New Access Token to obtain a token and use it to authenticate requests.
This approach will help you ensure that the OAuth 2.0 authentication flow works correctly.
While OAuth 2.0 offers robust security features, its implementation can come with a few challenges:
Token expiration: Access tokens have a short lifespan, so you must implement a token refresh mechanism to ensure that users stay authenticated.
Token storage: Storing tokens securely on the client-side can be tricky. Avoid storing tokens in local storage or cookies without proper security measures.
CORS issues: OAuth flows often involve cross-origin requests. Configuring CORS (Cross-Origin Resource Sharing) properly can be challenging but is necessary for handling requests from different origins.
To maintain a secure session, you must implement a refresh token mechanism. A refresh token allows the client to obtain a new access token without requiring the user to reauthenticate.
Here’s how you might handle token refresh in your Node.js app:
// Simulating token refresh process
const refreshToken = ‘your_refresh_token’;
const refreshUrl = ‘https://oauth2provider.com/token’;
fetch(refreshUrl, {
method: ‘POST’,
body: JSON.stringify({
grant_type: ‘refresh_token’,
refresh_token: refreshToken,
}),
headers: { ‘Content-Type’: ‘application/json’ },
})
.then((res) => res.json())
.then((data) => {
console.log(‘New access token:’, data.access_token);
});
PKCE (Proof Key for Code Exchange) is a security enhancement to the OAuth 2.0 authorization code flow. PKCE helps prevent code interception attacks by requiring the client to send a code challenge when making the request, and later verify it when exchanging the code for a token.
You can implement PKCE in Node.js using libraries like pkce-challenge:
npm install pkce-challenge
const pkceChallenge = require(‘pkce-challenge’);
const { code_challenge, code_verifier } = pkceChallenge();
PKCE significantly improves the security of OAuth 2.0 implementations, especially for public clients like mobile apps.
Handling User Authorization: Role-Based Access Control (RBAC): This is a widely accepted method of user authorization. Here, users are assigned roles and permissions are associated with these roles. Thus, every role has certain privileges that allow the users to take some actions based on the role assigned to them. For example, an administrator role might have full access to all resources, while a regular user role might have limited access.
Scopes in OAuth 2.0: Scopes are a new feature introduced by OAuth 2.0 to allow finer management of user authorization. Scopes define the level of access that is granted to a client application for a particular resource. Clients requesting access tokens specify the scopes required, and the authorization server issues tokens with the corresponding permissions. For instance, if a client application requests a read-only scope, it can use resources just for viewing; the write scope enables modification of resources.

By following these best practices, you can fortify the security stance of your API against the common threats and vulnerabilities that assail it. Always remember to make security a priority in the development lifecycle and periodically review and update measures as per changing threats to keep your Node.js API integral with OAuth 2.0.
Check and clean all data that comes in to stop injection attacks and make sure the data is right. Do checking for input data types, lengths, and formats to reject harmful or messy input. Use libraries such as Joi or express-validator to make data checking easier and rule validation more strict.
Encode and escape all user inputs and outputs for prevention of XSS and injection vulnerabilities. Sanitize user input by escaping special characters and using output encoding mechanisms like HTML escaping or parameterized queries in database interactions.
Have good logging and monitoring to see API activity and find strange actions or security issues. Log important events like login tries, access rules choices, and error situations using structured log formats. Use log tools such as Winston or Bunyan to gather logs in one place and allow real-time watching of API activity.
Keep the security updates and fixes for Node.js dependencies, OAuth 2.0 libraries, and other third-party modules used in your API. Check security advisories and vulnerability databases for known security issues and timely patches. Upgrade your environment to a fully automated dependency scanning and vulnerability assessment system that can keep your development environment up-to-date and secure.

Azure Cosmos DB is an excellent choice for creating responsive, globally distributed applications, including e-commerce platforms, IoT solutions, gaming systems, and real-time analytics.

In this blog, we can discover the step by step method of the use of Docker for improvement and deploying Docker bins to set up your full-stack utility, encompassing each backend and frontend components.

You’re probably wondering, “How do I actually get started with Azure Digital Twins in my drilling operations?” Good news: it’s simpler than you think. Here’s a basic guide to help you get up and running


Founder and CEO

Chief Sales Officer